濾鏡
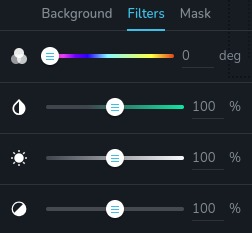
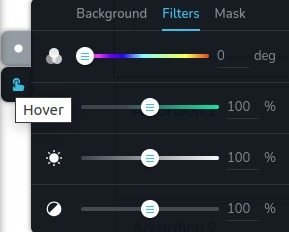
此控件提供了一個用戶界面,用於調整 CSS 的 filter 屬性。它包含四個滑桿,每個滑桿負責調整一個特定的濾鏡屬性:hue、brightness、contrast 和 saturation。
控件範例:

狀態為 "hover" 的控件範例:

參數
| 名稱 | 類型 | 預設值 | 說明 |
|---|---|---|---|
id | string | - | 控件將保存數據的鍵的標識符 |
type | string | - | 使用此控件的類型應為 "filters" |
position? | number | - | 控件在工具列中的位置 |
roles? | Array<Role> | - | 僅當當前使用者的角色匹配提供的陣列中的某個角色時,才渲染控件。 type Role = "admin" | "viewer" | "editor" | "designer" | "manager" |
devices? | "all" | "desktop" | "responsive" | "all" | 定義控件將在哪些設備上渲染。 "all" 在所有設備上渲染控件。 "desktop" 僅在桌面設備上渲染控件。 "responsive" 在平板和手機設備上渲染控件。 |
disabled? | boolean | false | 配置控件在什麼條件下被禁用或啟用。 |
states? | Array<State> | ["normal"] | 允許根據元素的狀態設置不同的樣式。 State = "normal" | "hover" | "active" "normal" - 元素的正常狀態, "hover" - 元素被懸停時的狀態, "active" - 元素處於活動狀態時(例如,分頁中當前頁面)的狀態。 |
default? | Default | - | 控件的預設值。Default: { brightness: number; hue: number; saturation: number; contrast: number; } brightness - 調整圖像或元素的亮度 hue - 控制應用於圖像或元素的色調 saturation - 調整應用的色彩飽和度 contrast - 控制顏色之間的對比度 |
selector? | string | - | 將應用樣式的 CSS 選擇器 |
style? | function | - | 此函數根據控件的值生成 CSS 輸出。參數是一個包含 value 鍵的對象,該鍵保存了控件的當前值。該函數返回一個包含 CSS 選擇器鍵和 CSS 屬性值的對象。
|
基本範例
僅使用必需的鍵來進行標準定義。此控件將在所有設備上顯示。
{
  id: "filters",
  type: "filters"
}
返回值
控件返回一個�包含每個過濾器屬性的當前值的對象。
{
  brightness: number;
  hue: number;
  saturation: number;
  contrast: number;
}
值的範例:
{
  brightness: 100,
  hue: 0,
  saturation: 100,
  contrast: 100
}
使用範例
角色範例
僅對具有 admin 和 designer 權限的使用者顯示此控件。
{
  id: "filters",
  type: "filters",
  roles: ["admin", "designer"]
}
設備範例
它將在所有設備上渲染。此值可以省略,因為預設為 "all"。
{
  id: "filters",
  type: "filters",
  devices: "all"
}
僅在 desktop 上渲染。
{
  id: "filters",
  type: "filters",
  devices: "desktop"
}
顯示將限於響應模式,特別是 tablet 和 mobile。
{
  id: "filters",
  type: "filters",
  devices: "responsive"
}
禁用範例
控件將被禁用。通常這裡應該設置您的動態條件。
{
  id: "filters",
  type: "filters",
  disabled: true
}
當變數 videoType 為 "custom" 時,控件將被禁用。
getValue 是一個允許我們通過 id 獲取控件值的 getter 函數。
"videoType" 是下面 "select" 控件的 id。
const getToolbarContols = ({ getValue }) => {
  const videoType = getValue("videoType");

  return [
    {
      id: "videoType",
      type: "select",
      choices: [
        { title: "Youtube", value: "youtube" },
        { title: "Custom", value: "custom" },
      ],
    },
    {
      id: "filters",
      type: "filters",
      disabled: videoType === "custom",
    },
  ];
};
狀態範例
獨立使用控件在正常和懸停狀態。
{
  id: "filters",
  type: "filters",
  states: ["normal", "hover"]
}
允許控件在正常、懸停和活動狀態下工作。
{
  id: "filters",
  type: "filters",
  states: ["normal", "hover", "active"]
}
預設值範例
預設控件值將應用於 brightness、hue、saturation 和 contrast。
{
  id: "filters",
  type: "filters",
  default: {
    brightness: 100,
    hue: 100,
    saturation: 100,
    contrast: 100
  }
}
僅設置 hue 屬性的預設值。其他屬性將為 0。
{
  id: "filters",
  type: "filters",
   default: {
    hue: 100
  }
}
CSS 範例
使用選擇器配置 .brz-image 元素的 CSS filter 屬性。
{
  id: "filters",
  type: "filters",
  selector: ".brz-image"
}
此代碼根據 hue、saturation、brightness 和 contrast 的值動態調整具有 .brz-image 類的元素的 filter 屬性。
{
  id: "filters",
  type: "filters",
  style: ({ value }) => {
    const { hue, saturation, brightness, contrast } = value;

    return {
      ".brz-image": {
        filter: `brightness(${brightness}%) hue-rotate(${hue}deg) saturate(${saturation}%) contrast(${contrast}%);`
      }
    };
  }
}
在 HTML 中的使用範例
在下面的範例中,我們演示如何實現過濾器控件並將其值應用到圖片元素的 CSS 屬性。
import { Brizy } from "@brizy/core";
import React, { JSX } from "react";

interface Props {
  brightness: number;
  hue: number;
  saturation: number;
  contrast: number;
}

const Image = (props: Props): JSX.Element => {
  const { brightness, hue, saturation, contrast } = props;

  const filterStyle = {
    filter: `brightness(${brightness}%) hue-rotate(${hue}deg) saturate(${saturation}%) contrast(${contrast}%);`,
  };

  return (
    <div className="brz-image" style={filterStyle}>
      <img src="image-source.jpg" />
    </div>
  );
};

Brizy.registerComponent({
  id: "ThirdParty.Image",
  component: { editor: Image, view: Image },
  title: "我的圖片",
  category: "essentials",
  options: (props) => {
    return [
      {
        selector: ".brz-image",
        toolbar: [
          {
            id: "settingsTabs",
            type: "tabs",
            tabs: [
              {
                id: "filters",
                label: "過濾器",
                options: [
                  {
                    id: "filters",
                    type: "filters",
                  },
                ],
              },
            ],
          },
        ],
      },
    ];
  },
});